Thursday 30 May 2013

Alfred.

We had the lovely Tom Thackray and his son-in-law Steve in this week, teaching us the traditional craft of windsor chair making and I must say that I've thoroughly enjoyed the week. We've gone back to the traditional methods with nary a machine in sight (unless you count the lathe), using some basic but useful hand tools - from wooden spokeshaves to giant pencil sharpeners (or rotary planes to those in the know). Working in groups of three, our Alfred has turned out a sprightly little fellow (despite Jonathan's best attempts to the contrary :p), even if we do say so ourselves.

Tom and Steve run classes on windsor chair making in their workshop in Nottinghamshire, so if you ever fancy having a go at this yourselves, I would thoroughly recommend it!
http://www.tomthackray.co.uk/

Shaping the seat using a wooden travisher. Hamish photo-bombing (again)


In the making I've learnt how to fit a square peg in a round hole

Our wee Alfred, all grown up
For those of you who are curious as to how my restoration project turned out, here are some pictures of the finished piece (see last week's instalment for a picture of what the board originally looked like, with a large crack running through the middle). This has probably been the most fun project I've embarked on since the start of the course, and certainly the quickest and least distressing. In the making I've discovered that I enjoy and am pretty good at pigment/colour work, which is a bonus as everything else doesn't really seem to come naturally!
My dinky little table in all its glory

A close-up of the restored crack

Restored board - I had lots of fun painting in the little cracks and holes 


On a more somber note, someone at the workshop had an accident last week, which was quite scary and sad. I guess it serves as  a reminder to always have a healthy respect for the machines. All it takes is a momentary lapse of concentration or over-confidence, and its bad news all around.

Thursday 23 May 2013

New Projects.

Its been a nice rejuvenating long weekend with a jaunt to the Borders and a Eurovision party. Even better, I've come back with bits for new projects.

First up is this cute little board found in a shop in Peebles. It was quite a fortuitous find, and just in time for restoration week (although the tutor has sniffed at my unconventional take on restoration). Requiring some minor restoration (patching up a hole in the lower right corner and small holes left by random nails), I've decided that I'm going to make it into a small side table. Bish bash bosh - bang on some legs and a frame and hopefully it will make a dinky little table.

Cute board found in shop
Minor restoration in progress


I've also found some little ceramic tiles which I'd like to embed in some new furniture. Made by a local ceramic artist down in the Borders, I couldn't resist purchasing them. I'm still undecided as to what I'm going to use them for (maybe handles or just a random highlight), but I'm sure whatever it is will be fun!
All spotty!

On top of all this general busy-ness, our wee Jonathan has been busy setting things on fire in the workshop. Someone really should start reigning him in!
I have no explanation for this. I don't think anyone does.


Thursday 16 May 2013

Half term. Again.

So here are the shiny things all done and dusted - not quite as shiny as Ewan's, but still shiny. Gilding has proved much trickier than first anticipated - too little water and the gold leaf doesn't stick too well, but too much water and it leaves water stains on the piece. Goldilocks syndrome aside, the burnishing bit (ie the bit where you make it go even shinier) has been, for me, the trickiest part. Every time I try to rub it harder to achieve the desired effect, I end up ripping off bits of gold leaf by accident.
Hamish looking a little dorky

Finished distressed verre eglomise panel
Another month gone, and we're up to the half term break. Everyone seems to be getting a bit more serious now that yet another month has flown by (school's almost out, yikes!). People are starting to prepare for life after school (boo to having to go back to the real world), with business plans, websites and business cards all in the offing, wood being stockpiled, machines and tools bought, etc. Me? So far I've finished my portfolio and managed to put some of my pictures up on flicker  (http://www.flickr.com/photos/madebymae/). Guess you've got to start somewhere.

The secret project is making some progress, although at a slower pace than anticipated. I thought it would be much quicker building something with no blasted curves in it, but sadly not. Can't seem to get away from the routing though. Now that I'm pretty much in the middle of this project, I'm starting to think about the next one and wondering what I can make - any suggestions would be appreciated!


Thursday 9 May 2013

All that glitters is gold.

The start and the end of any woodworking project are to me, probably the most tedious and boring parts. Unsurprisingly, they are also probably the most important. The start, after the initial euphoria of designing, involves an awful lot of planing, sanding, gluing up panels, more sanding and cutting panels of wood to size. After a week (or two or three) of it, the process just seems interminable and slightly soul destroying. Yet, if not done properly, you'll have pieces of wood which aren't flat or square and which warp, with the grain going in every which direction.

There is a pretty fun (if a little stressful) bit in the middle which involves putting things together and seeing things take shape, then you go back to a life of dreariness which involves sanding and scraping, finishing, sanding, finishing, sanding, finishing, etc. If you do this right, you get a shiny, gleaming piece of furniture at the end of it - extremely tactile and strokable, just inviting you to run your hands all over it. Do this wrong, and you'll see pencil marks, splotches, orbital sander marks, router burns, raised grain and all manner of other unsightly things marring the finished product.

So what's brought on this bout of musings? Well, at the moment I'm working on a kind-of secret project which involves a heck of a lot of planing and sanding. I am hoping to finish it by the end of term and bequeath it on the rightful recipient, who is going to be quite surprised and I hope, pleased with the end result, although its had a bit of a round-a-bout way in the making. You'd think writing about it would defeat the super secret element, but I'm banking on the fact that no one really reads these things anyway.

In terms of course work, we've moved on to gilding this week. The initial application of rabbit skin glue (not as smelly as vaunted) and gesso is messy but fun - you kind of slap it on (as evenly as possible) in as messy a fashion as possible. Next though comes the not-so-fun bit, hours of sanding. Yes, more sanding, and possible more tedious than normal sanding as every time you try to get that final bit to make it perfectly smooth, you end up sanding through to the wood and having to slap on more of the gooey stuff and start all over again. After that you bang on some colourful clays, and hey presto, you're good to coat everything in gold leaf. I've found the laying of the leaf the most enjoyable bit. You tend not to breathe during the entire process, as a last minute exhale at the wrong moment will cause the entire leaf to fold, crinkle and float away, but other than that its a delicate fun little exercise.
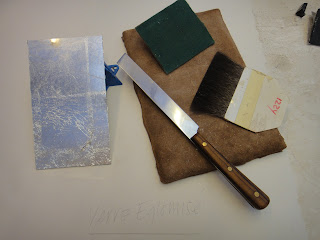
A selection of tools required for the verre eglomise technique of gilding the back of glass panels to create a mirror

My lion after 100 layers of gesso (and much sanding), base yellow bole/clay and top coat bole/clay coats.

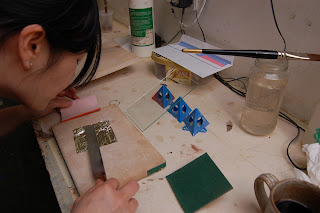
An action shot of gilding in progress

Thursday 2 May 2013

Carving.


Carving out a lion's head
Week 2 of carving and Charlie Oldham, the visiting tutor, has imparted some little gems of wisdom which I thought I would share:
1) The best woods to carve are jelutong and lime.
2) Never undercut until the last possible moment.
3) Eyes are a weird one to carve as they look like they are staring at you the entire time. Concentrate on the area around the eyes (the negative spaces), rather than the eye itself.
4) If you've cut away too much on a particular bit by accident, you may still be able to salvage the piece by flattening/lowering the other bits.
5) Perspex is quite helpful in trying to trace out a 3D image.

Finished carvings in various styles


I've finished with the routing experiment and sadly have to report that FEAR is back and doesn't appear to be going away any time soon. All I need to do is pick up a piece for routing before I start sweating profusely. On the plus side, I've finished my clothes horse and my carved mirror. The only question now is whether or not I gild the trees for my mirror?


Yes, that is spring you see in the background
These don't really look like cacti do they?

Hand-carved mirror frame
Up close - am also thinking about adding a sycamore mitre key as a feature (and for added strength)
It gets really busy in the workshop most days and there's always a nice background rattle and hum of work in progress (unless Ben's on the planer in which case it sounds more like a jumbo jet taking off in your back yard). The thing I like the most though is that there are usually several different conversations going off at any one time, and its quite easy to float in and out of any one of them, which is a nice way of breaking up the day. A hot topic of conversation this week has been a much neglected one in recent weeks, namely our Jonathan. We've had a busy week of trying him out in (on?) more furniture to a variety of results.

A piece of Jonathan proportions
Definitely not a Jonathan


You won't quite believe what you can do with a Jonathan until you see it for yourself